Autotask to Xero -> Configuration -> Link Account Codes
Please be aware that our system utilizes a caching server to enhance the speed of page loading. However, if any modifications are made in Autotask or Xero after logging into Cloud Depot, these changes may not be immediately reflected. To ensure the most up-to-date information, you can use the Refresh Accounting Info button to refresh the data. Alternatively, you can log out and log back in again.
What Gets Mapped from Autotask?
Autotask PSA -> Admin -> Features & Settings -> Finance, Accounting & Invoicing -> Billing Codes
Each billing item in an Autotask invoice is assigned a specific Autotask billing code, which our synchronization tool directly maps to.

Default Accounts
These default mappings are used for your sync. If an account code mapping is not found, these default mappings will be used.
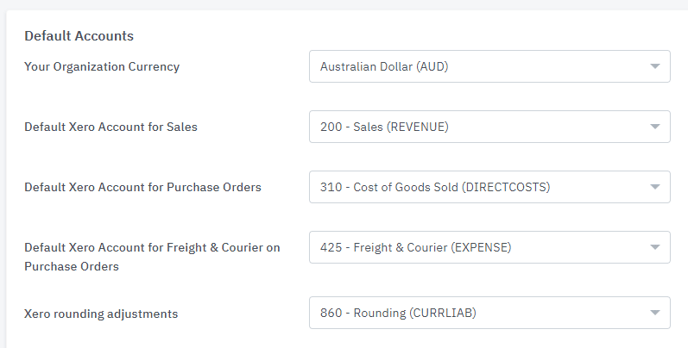
Please note that it is necessary to enter a Default Freight and Courier account, even if you do not use our Purchase Order module. This ensures that your account mappings are complete and accurate.
Adding a new link between Autotask and Xero
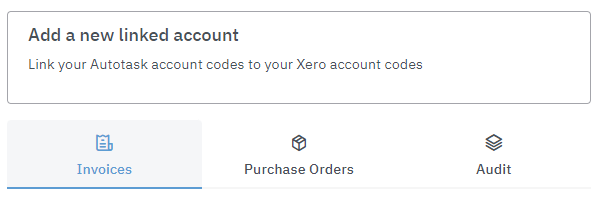
In this section you are presented with 3 tabs to select from
a) Invoices - These are the invoices generated as sales invoices in Xero.
b) Purchase Orders - These refer to Xero purchase orders or bills, depending on your configuration. If you are not utilizing the Purchase Order module in Cloud Depot, there is no need to configure this section.
c) The Audit tool is a valuable resource for identifying and resolving incorrect or missing mappings. It allows you to review the mappings for each line item in an Autotask invoice by entering the invoice ID number. This tool is particularly helpful when you encounter issues with mappings that are not set up correctly.
Creating a Mapping Link (Invoices & Purchase Orders)
1. Autotask Account Codes - Locate the Autotask account code by using the search box.
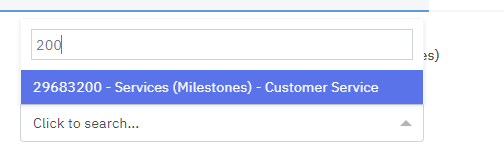
2. Xero Account Codes - Use the search box to find the Xero account code

If you want to include all types of account codes, you can uncheck the checkbox to remove the filter that excludes non-sales account codes.
3. After selecting both the Autotask and Xero account codes, simply click the Link button to finalize the mapping. The mapped accounts will then be displayed in the table below for your reference.

Please note a Autotask Account Code can only be mapped to once.

Audit Tool

Note: The Audit tool is read only, it doesn't input any data into Autotask or Xero
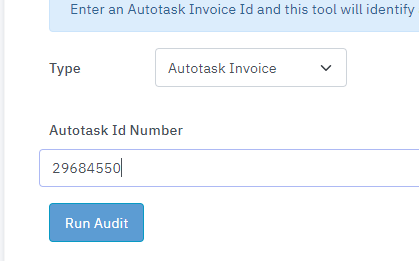
1. Select the type of Audit you are running (Autotask Invoice or Purchase Order)
2. Enter the Autotask Id Number (can be found in the Sync Overview page. Autotask to Xero -> Sync Overview)

3. The Audit tool will run for a few seconds as it retrieves real-time data from Autotask. Once completed, the results will be displayed in a table format similar to the one shown below.

If no mappings are found, the system will generate a warning message similar to the one shown below.
