Connecting HaloPSA to Cloud Depot (API)
This article explains how to setup your HaloPSA with Cloud Depot
To complete this process you will need administrator access to HaloPSA. Cloud Depot uses API-Only agent user access with no web access.
Step 1, Create the Halo Agent User
HaloPSA -> Configuration -> Teams & Agents -> Agents
Log into HaloPSA and navigate to Teams & Agents then select Agents then click +New
 |
 |
Setup the account details make sure that you create a strong password(click to open random.org)

- Is an API-only Agent - Selected
- Roles - You do not need to assign any roles
- Default Team - No Default Team
- Work Hours - 24 Hours
Save the details and move onto step 2 below.
Step 2, Set the Permissions in HaloPSA
Once the apiuser has been saved, select the Permissions tab to set the minimum permissions required.

The API permissions below are minimum required.
| Customers Access Level | Read Only |
| Purchase Orders Access Level | Read Only |
| Invoices Access Level | Read, Create and Modify |
Step 3, Create the API and copy the details into Cloud Depot
With the user agent successfully created in Halo, the next step is to configure an API user. This API user will utilize the permissions associated with the user agent to provide Cloud Depot with the necessary access. Importantly, this API user will not contribute to your license count and will not have access to the web application of your account.
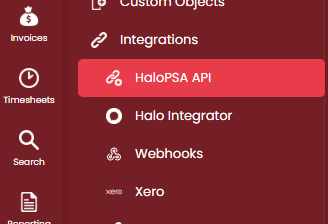
HaloPSA -> Configuration -> Integrations -> HaloPSA API


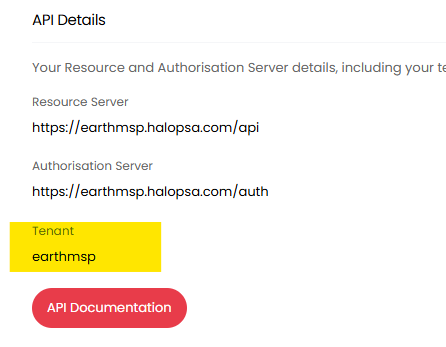
3. After copying the Tenant into your notepad, proceed by clicking on the "View Applications" option.


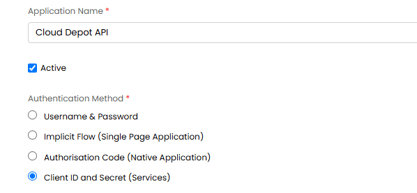
| Application Name | Cloud Depot API (or similar name) |
| Active | Checked |
| Authentication Method | Client ID and Secret (Services) |

Once you have confirmed these details, click on "Save Settings" in HaloPSA to finalize your changes.

7. Navigate to the Permissions tab click Edit and then apply the following settings then click Save
- all:standard
- all:teams
- admin:webhooks

8. Log into Cloud Depot then navigate to Integrations -> HaloPSA and enter those items that you have saved in your notepad


Verify your credentials by clicking the "Save Changes" button. If the process is successful, your credentials will be securely encrypted and stored in Cloud Depot. Once you have confirmed that the details have been correctly entered into Cloud Depot, you can safely discard the information saved in your notepad.
Tip: It is recommended to enhance security by rotating your client secret every 90 days. You can easily do this by clicking the Generate button on the API Details page in Halo and then updating the new secret in Cloud Depot.