Please be aware that Xero is currently updating the payment links within the platform, so these instructions may be slightly outdated. For the most current instructions, please refer to the KB article linked below.
This allows your customers to pay using the payment methods you have configured in Cloud Depot (such as Credit Card, Direct Debit, or Instant Bank Pay) while keeping the accounting automatic.
Step 1: Get your Custom URL from Cloud Depot
First, you need to grab the unique link for your portal.
-
Log in to Cloud Depot.
-
Navigate to Recurring Payments -> Configuration.
-
Select the Customer Portal tab.
-
Click the sub-tab labelled Xero Payment Details.
-
Copy the long web address listed under "Your Custom URL".

Step 2: Create the Payment Service in Xero
Next, we tell Xero that this URL exists.
-
Log in to Xero.
-
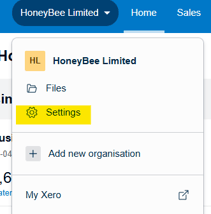
Click your Organization Name (top left) and select Settings.
-
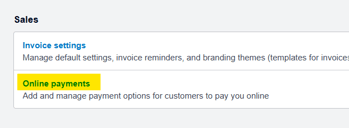
Under Sales heading click Online payments
-
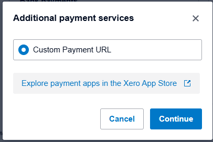
Click the "Payment Services" button
- Click Add a new service

-
At the bottom of the page is a a option to add another online payment option. Click that

-
Fill in the details:
-
Account Name:
name of your payment page(payments.example.com). -
Your custom URL: Paste the link you copied in Phase 1.
-
Pay now button text:
Pay Online(Or similar text. This is the text your customers will click).
-
-
Click Save.
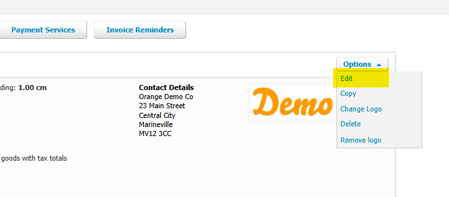
Step 3: Connect it to your Invoice Templates
Finally, you must switch this service "On" for the invoice templates you send to customers.
-
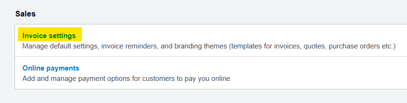
In Xero Settings, go to Invoice Settings.

-
Find the Branding Theme (template) you use for customers (e.g., "Standard").
-
Click Options -> Edit.
-
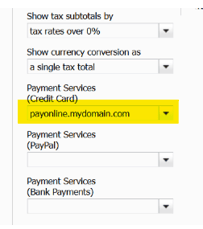
Find the Payment Services section (usually under "Payment Services - Credit Card").
-
Select you payment gateway (name you choose in step 2) from the dropdown list.
-
Click Save.
Done! Your Xero invoices will now feature a "Pay Online" button that directs customers to your branded Cloud Depot portal.
Note: If other payment services are listed in the other dropdowns you can delete them from the dropdown and that will remove them.