In the hierarchical relationship between Autotask and Xero. Cloud Depot Autotask to Xero integration treats Autotask as the parent and Xero as the child.
It's recommended that Autotask contact data is always kept up-to-date when making updates to Xero contact data.
NEW for 2025
In a recent update, Autotask introduced the concept of a 'Main Billing Contact', which allows you to designate a single contact for billing purposes. Please click here to read more about this feature.
To assist our sync tool in selecting the correct Autotask contact we recommend setting up the UDF field below. If you need support setting this up please contact our support team.
1. Navigate to User-Defined Fields in Autotask
Autotask - > Admin -> Features & Settings -> Application-Wide Features -> User-Defined Fields
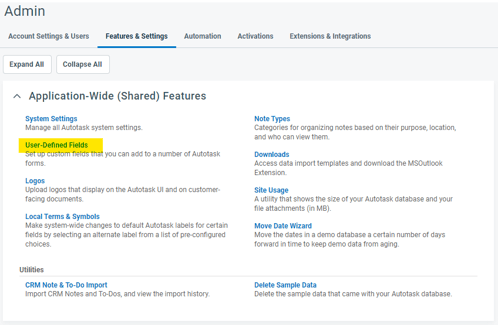
2. Select the Contacts Tab & Select New

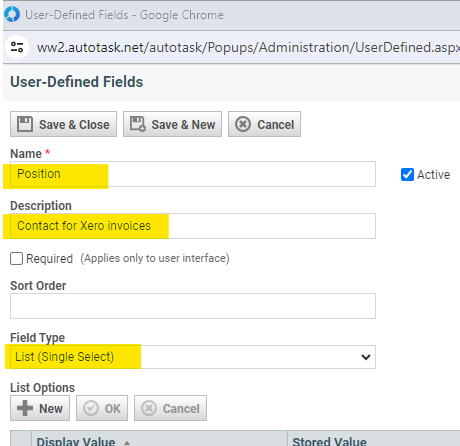
3. Create the UDF
A pop-up module form will appear, enabling you to set up the User-Defined Fields. Please refer to the attributes listed below for configuration.
Name = Position (Required)
Description = Any text you wish to use
Field Type = List (Single Select)
Do not use multi-select list type it will not work with Cloud Depot
4. Add the UDF Item
Click 'New' button to add a item to the list

Display Value = Any text you wish to use in our example we use Xero Invoice Contact
Stored Value = Accounts (*required, don't use any other value)
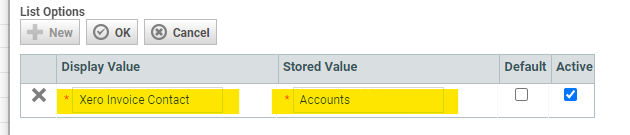
Note: You can add other values to the list if you wish to use it for other uses outside of Cloud Depot, it will not impact your sync.
5. Setting the Position in the Autotask Account (Company)
Within the Autotask CRM, locate the contact that you wish to assign the Xero account's position to.

Navigate to the contact and scroll to the bottom of the page to find your Position UDF under the User-Defined Fields section.
Click into the Position item to show the drop down list and click save.

Repeat this process for the other contacts that you have configured within Autotask in order to assign the correct account contact for Xero.
How to configure the Contacts screen in Autotask to show the position UDF column
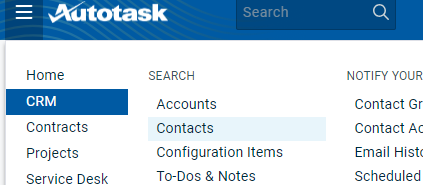
1. Log into Autotask navigate to CRM - Contacts

2. In your view grid select the column chooser

Then select Contact: Position and
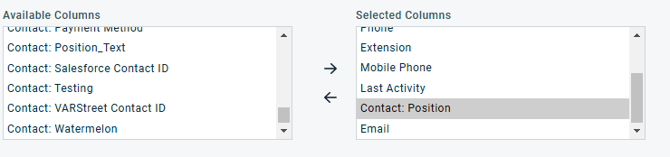
Click Save & Close
The position column will now be displayed, enabling you to easily identify Autotask companies that may not have a contact associated with the User-Defined Field (UDF) setup.
FAQ
Do you have a report that I can run that will show me contacts that don't match to Xero?
Yes you can use our Autotask to Xero Contact Report report to identify Autotask/Xero companies that do not align or where positions have not been set. This report can also export a CSV file that can be imported into Autotask to quickly setup Autotask contacts with the position dropdown set.
What happens if I setup multiple contacts in Xero with the Accounts UDF?
If multiple Autotask company contacts are assigned the Accounts UDF, the synchronization process will encounter an error. To designate several individuals in Xero to receive invoices, please utilize the Additional People for Xero contacts feature.
If you get stuck or need assistance please don't hesitate to reach out to our support team.