Introduction:
A payment profile is a collection of notifications, payment rules and accounting rules. Each customer can have one payment profile but a payment profile can be attached to many customers. Making it easy to manage customers at scale.
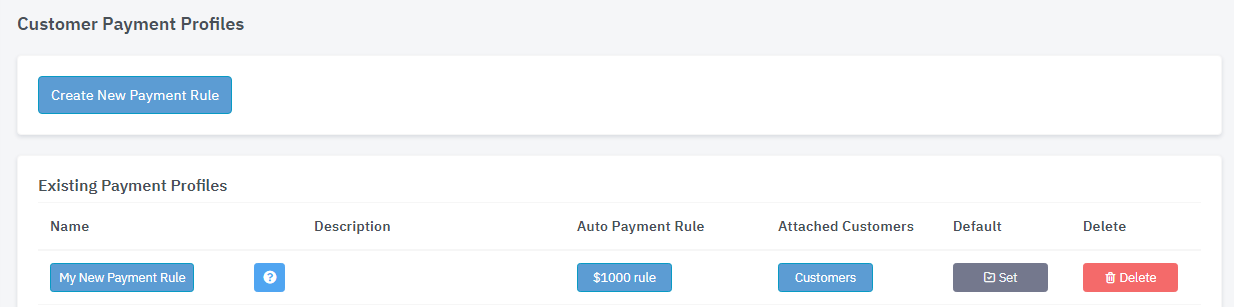
Recurring Payments -> Configuration -> Payment Profiles
A default payment profile will be created when you setup your account, feel free to edit the default to suit your needs.
Auto Payment Rule
Auto Pay Rule are the conditions required to pay an invoice automatically, these rules are attached to a Payment Profile or multiple Payment Profiles.
For more information about Auto Payment Rules, click here.
Attached Customers
This will list all the customers who are currently using this Auto Payment Rule
Default
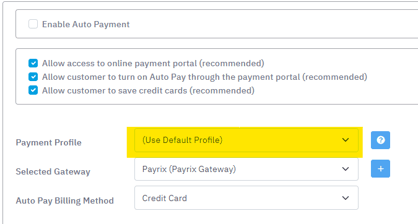
Where a customer card Payment Profile is set to 'Use Default Profile' that customer will inherit whichever profile from your list is set as the default.
Creating a Payment Profile
Your profile will require a name the description field is optional
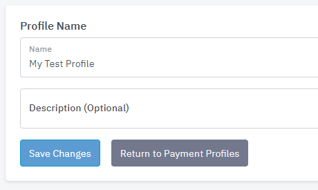
Once your profile is saved, more options will become available
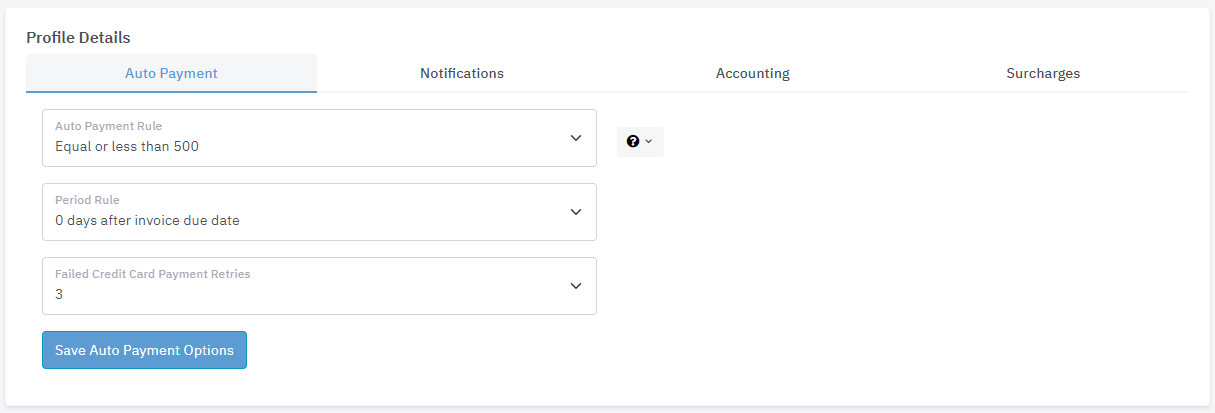
Auto Payment Rule
Auto Payment Rules are the conditions required to pay the invoice automatically. Invoices will only Auto Pay if the customer card is set to do so. By default it is turned off per customer. Our sample rule is set up to allow Auto Pay to pay the invoice if the invoice is equal to or lower than $500. For more information about Auto Payment Rules click here.
You can choose another template here, or add a new one by clicking the little question mark to the right of the rule.
You will see the Period Rule is set to 0, and the Failed Credit Card Payment Retries is set to 3.
Period Rule = 0 (This means it will charge the card on the same day it is due)
Max retries = 3 (This means it will try up to 3 times to bill the customers card)
Tip: Avoid setting too many retries as each retry can result in additional gateway fees.
Notifications
Notifications alert you and your customer of payment activity. These can be setup under the notifications section. By default, these are set to:
Fail Email Template: Credit Card Charge Failed
Receipt Email Template: Customer Digital Receipt
Internal Receipt Email Template: Internal Dashboard Payment Notification
You can also set the Internal Receipt Email Address away from the default if you wish the notification to go to a different email (for example, accounts@).
Accounting
Here you can set the automated payments to be switched to apply the payment to your accounting provider, for example Xero. This is a check box that can be switched on or off. By default it is off.
Surcharges
Here is where you can define the surcharge that is added to the invoice during payment, if this applies to you. For more on Surcharges, click here.
You can apply a Surcharge Rule and Surcharge Account Code, and switch on or off the ability to append the surcharge as a line item to the original invoice.
Surcharge Account Code
This is the account code that the surcharge line item will use, please note the tax code used will be the same as the account code, so its recommend you create a new account code for surcharges.
In the main area, you can create your own Payment Rule, Delete our example, or edit the example with your own details.
If you are struggling with setting up this area, or editing it, please contact our Support team and we would be happy to help you walk through it to best suit your business needs.